My "middle little" wanted a ice cream party for her 4th birthday. I love making decorations, and this time I wanted to keep it cheap and simple. Have you ever browsed the internet for birthday party ideas and stumbled upon those blogs? You know, the handmade outfits that match the decor, wooden forks, macaroons, the many glass jars of candy that no one ever eats, custom cupcakes and lollypops and cookies, the miniature milk jars with straws! Oh, I'm guilty... I bought the "push-up cake pops" that got pushed up and dropped on the ground. The themed food that I spent hours making that not one child touched, the days I spent looking for the perfect matching cups, plates, cupcake liners and table cloth, only to be completely overlooked by the same dozen of balloons. I would come up with crafts and games only for them to say, "mom, we just want to play!" Sure, they appreciated the party, but was all the tedious details really necessary? All that stress about not finding the perfect sprinkles?
"But Martha [overly occupied and too busy] was distracted with much serving; and she came up to Him and said, Lord, is it nothing to You that my sister has left me to serve alone? Tell her then to help me [to lend a hand and do her part along with me]!
But the Lord replied to her by saying, "Martha, Martha, you are anxious and troubled about many things... There is need of only one or but a few things. Mary has chosen the good portion [that which is to her advantage], which shall not be taken away from her." Luke 10:40-42
This verse has helped me return back to earth in so many ways. I want my kids to enjoy their childhood and see my love poured out for them. Martha was so focused on the preparations for Jesus being in her home, that she missed the opportunity to actually spend time with Him. I don't want my kids to remember their mom stressing and pouring herself out for parties props and meaningless things. If I'm going to "pour myself out," I want the pouring to be funneled directly to their heart. Purposeful pouring! Yes, yes.
"There is need of only one or but a few things." I love to create and design parties, and like I've said... I don't know when to stop! So this was my homework for my daughter's party. One project. It was hard, {And, I sound like an addict...} but, I was amazed at how much leisure time I had, and I was able to really enjoy her birthday... imagine that!
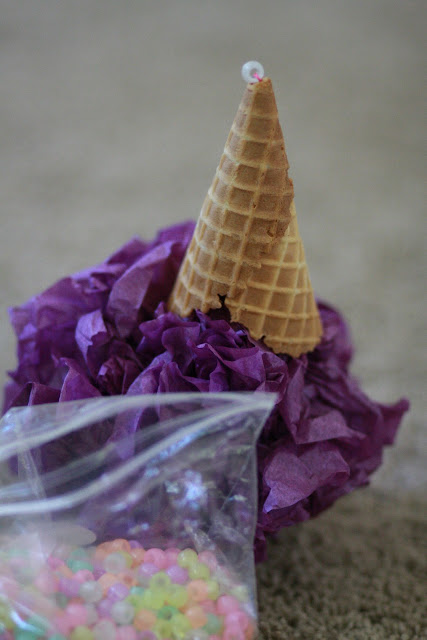
To make the paper ice cream cones you will need a box of real waffle cones, different color tissue, scissors, party ribbon, clear beads & glue gun. (Not glue stick, I thought I was going to need it, but did not!)
First, start by taking all 8 tissue papers from the package and laying them out flat. Cut in half so that you have two separate pieces. One pack of tissue will make 2 small pom-poms.
Take one set and accordion fold it.
Cut a long piece of ribbon and tie the folded tissue in the middle. Make sure there is enough ribbon at the ends... this is important!
Now take each tissue and spread them open.
It should look like this when you have spread them all out.
Next, you will need to gently cut a hole at the bottom of the cone, enough for the ribbon to slip through.
Cut a tip at the end of one of the ribbons and slide that one through. (That is why you need to have the length on the ends when you first cut the ribbon... mine was a little short!)
Tie a bead to the end of the ribbon. This should secure the cone from breaking or the ribbon sliding through. (Later on, I decided to add some hot glue to the end just to make sure the ribbon and bead stayed in place.)
Here's what it should look like. Next, tie a loop with the other end of the ribbon for hanging, or...
... to another pom-pom and make a double scoop!
The more colors, the better! (Note: I would suggest making these the night before and then hanging them right before the party. The longer the cones stay out, the softer they get. If you are hanging them outside they will only last for about 4-6 hours. As they hang the moisture begins to unravel the cone! In fact, I left them up, and the next day they were turned inside out and hanging down the opposite direction!)
Single & double scoops! A simple, but bold center piece! Plus, the sweet smell of waffle cones are in the air! Yum!
That's it! I printed a free birthday banner, glued it to some scrapbook paper and bought those famous balloons! She loved it! And I survived another birthday... no sweat! :)


No comments:
Post a Comment